

 Starting to observe
1st Step. Although it is not strictly necessary, but it will optimize your observation, it is convenient to have a second piece of cardboard, as an "umbrella", if you are using a refractor telescope. For this, use a piece of cardboard of about 20 x 20 cm with holes in the center, so that it can be adjusted to the telescope tube like a "umbrella".parasol«, giving a shadow field over the image for better contrast. If you are using binoculars or another type of telescope, try to have a shadow around the projected image (e.g. you could place the cardboard to be projected inside a shoe box, so that the box itself casts a shadow).

2nd Step. Maneuvering carefully, point the optical instrument towards the Sun. Remember to have previously removed the finderscope in the case of a telescope, as you will not need it. To ensure that the telescope points at the Sun you only have to guide you by its shadow, that is, until the shadow cast is circular. Once this is achieved, secure the instrument, center the target and focus the eyepiece (in the case of telescopes, a 20 mm eyepiece is recommended to ensure that the entire solar disk is contained in the projection). Remember that due to the Earth's rotation, you will have to manually "follow" the Sun when it moves away from the eyepiece field, unless you have a motorized mount. However, it is advisable to cover the telescope/binocular after a few minutes so that the eyepiece/lens can rest and there is no risk of overheating (remember that they are concentrating all the light from the Sun!).
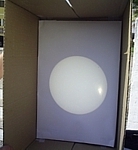
 3rd Step. Simply adjust the circle drawn on the cardboard to about 25~30cm of the telescope eyepiece or binoculars, until the projected image is in focus and fits perfectly in the circle. Once achieved, and making sure that the surface moves as little as possible, you can now draw the sunspots (if there are any) with a graphite pencil. Remember that some sunspots are made up of surrounding umbra and penumbra, which are darker and lighter areas respectively. As soon as you mark the stains, record them in the logbook, recording the data obtained.